Monday, March 13, 2017
Creating Company Logo Using CorelDraw
Creating Company Logo Using CorelDraw

Corel Draw is one of the graphics software highly reliable used to make design of a company logo, and an object that based in the vector layout. Corel Draw has more flexible control to create an object form that very soft, so your passion and desire to create a graphic design can be represented perfectly as possible according with your taste and your creations. For those of you who are still confused to begin about learning Corel Draw graphic as a design software. Ok! let us begin to practice in the process of creating the company logo.
In the process of making a company logo, you have to understand how to draw some type of object form in the vector, in this case I prefer to use "bezier tool" as a tool to draw. Using bezier tool allow you to create a path smoothy. After you create the path with bezier tool, the path consists with some nodes that determine the direction of the path. This is the excess of bezier tool to make the path smoothly and you can control easily using node direction. After the path you have created, make it in closed curve/path then you can fill it with the color inside. Fill color can be a monotone (basic) color, gradient or a pattern. Lets see the picture below!
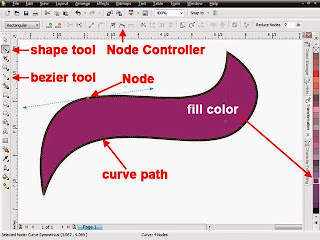
As the picture above the object form drawed by bezier tool that have fill color and the path with outline. Select the object and right click on any color on the palette color at right would be define the outline color. Select the object with the left click on any color on the palette color would be define the fill color of the object form. The path or curve that you created hase some nodes. Nodes is the point that has direction that you can control on the node controller to make the path form as you like. Combine with shape tool will allows you to adjust the nodes to an object form as you the desired.
In some case to create the company logo maybe consist with some object form to create one unified object, there are some shortcuts that may usually used.
"Shift + Page Up": to make the selected object into the very top of the layer stack,
"Shift + Page Down": to make the selected object into the very bottom of the layer stack, "Ctrl + Page Up": to make the selected object up another object,
"Ctrl + Page Down": to make the selected object down another object,
C: object 1 will be center horizontally with object 2
E: object 1 will be center vertically with object 2
T: object 1 will be align top to with object 2
B: object 1 will be align top to with object 2
L: object 1 will be align left to with object 2
R: object 1 will be align right to with object 2
To copy an object in the simple way that usually used, select the object by left click on the mouse, hold down and move to another place, you can combine with Ctrl and Shift on the keyboard, keep the left click and add the right click, then release the left click at first in the place where the object copy you want to put, and then release right click. The object will be duplicated to the place that you want.
Above is something that must be understood because frequently used. To make you more understand, please watch the article video, for the example in the process of creating the company logo!
Available link for download